Wednesday, June 15, 2016

Door Speaker replacement

After having to get the truck to pass inspection by putting a lot of work to it, I decided that it was time to address another issue that has been a thorn in my side, and that issue is that only the right side speakers were working properly. The drivers side speakers, on the other hand, either did not work or worked poorly, and the result was that no matter what you were listening to, other than talk radio, it sounded off. 

My first thought was that someone had replaced the stereo with an aftermarket one and had gone and blown out the left channel.  Listening to the music, however, I was able to detect a faint noise coming from the rear door speaker, which told me that the wiring was intact and the left channel from the radio was intact.
So these panels come off with a few screws being removed, but in this case you have to pull up on the door panel slightly before pulling it out.  If you do not do this, you will break off the tabs that seat the panel and end up with a panel that will not stay on.

When I opened up the rear panel, I was greeted with this:

On the left is how a speaker is supposed to look.  On the right, not so much.  This speaker had a little bit of noise coming out of it but not really enough to be intelligible.

You can see that the paper cone on the right hand speaker has ripped and separated from the frame.  This kind of damage suggests that a lot of bass was put through the speaker at a very loud volume.  Speakers, like everything else, have their limits, and these limits were clearly exceeded.

The front door was an entirely different matter, as I discovered a couple of things, like the tweeter (small speaker used to reproduce high frequency noises) had been disconnected, and the cone of the speaker just fell out of the door once the panel was removed, which would explain why there was absolutely no noise at all.  This tells me that someone tried to fix this before, and either could not or gave up for whatever reason.  The garbage inside the door also suggested something stupid went on at some point... 
Yep, so the speaker just fell apart there.  Three screws hold the speaker in place to the door frame.  These come out fairly easy.

Once the speaker is out, it's easy to separate the speaker from the frame.  Push those two tabs at the top out to the side and use a screwdriver to pry up on the speaker frame enough to clear the tabs.  Repeat this two more times and the speaker is out of the spacer.

On the top is the speaker frame spacer.  To install the new speaker to the spacer, I used a quick setting sealant, usually for oil pans and such, to hold the new speaker in place, as shown in the bottom picture.
Above is the new speaker with the sealant in place. I let it cure for half an hour or so before installation.  Supposedly it cures in five minutes or so but I could not see taking any chances with this.

TOP: This is the factory speaker connection. BOTTOM: I cut out the speaker connection and added these convenient terminals to connect to the aftermarket speaker.  The days of not having proper terminals on any wire end are long gone. You can blame progress for this, but to me bare wires being used as a wire terminal never really made any sense.

So now, you reinstall the speaker and this is a good time to make sure that it actually works before you put the door back together. Why? Because it is far easier to make repairs without taking the whole door apart again.  

So there you go, finally a fun project that adds no horsepower but increases driving pleasure...

Wednesday, June 1, 2016

String trimmer loss of power cause and repair.

Our subject today is how to fix your string trimmer when your laborers decide that they are going to misuse and abuse it to the point where it loses power and does not run at full tilt. 

A little backstory here: The company I work for bought several brand new string trimmers over the winter, most of which were impressed into service this spring, which as of this writing was less than 90 days ago.  Over the past week or two, several of them have come into the shop with massive power losses as the chief complaint.  What's the first thing I have noticed?  The guards have been modified. 

Tying the guards back to get a larger arc to cut down more weeds is a common trick employed by landscape laborers to get the job done faster, but it comes with a cost, and that cost is massive carbon buildup in the very small (less than 100cc) cylinder bore.  Essentially, allowing the string to come out longer than the factory intended places a drag on the clutch and the rings of the piston.  Drag means extra heat, but not necessarily more fuel being burned, and this is what leads to the carbon buildup.


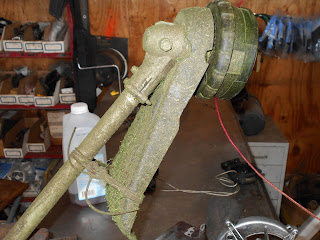
In this first picture, you can see that some goofass has taken it upon himself to tie the guard back closer to the shaft and therefore allow more trimmer line than necessary (or designed for) to be out at one time.  This trimmer has a very small engine on it, and all this will do for you is screw that engine up over a very short period of time. So the first thing I am going to do is...
Cut that line and make sure that the guard has not been completely messed up.  I also cut the excess line off because of the drag I mentioned earlier.  Which would you prefer? Either get the job done a little slower or not get the job done at all because I am busy fixing the machine you screwed up?


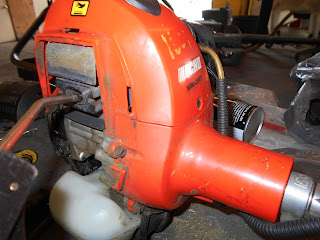
Top picture in this set of three shows you the allen head bolt that needs to be removed.  The second picture is of the muffler heat guard, which just lifts out of the way. Now in the third picture, this is the muffler.  Two 5/16ths nuts and two lockwashers  per side and the muffler will lift off. There will be a gasket behind the muffler which can be lifted out.  You might have to move (bend) a metal shield behind the muffler to get the gasket out.  The bolts slide out on either side.
It is hard to see in this picture but there is sufficient carbon build up to slow down the exhaust gases upon exiting the engine.  Remove the spark plug so that the piston moves up and down freely, and when the piston is at BOTTOM dead center (all the way down and just barely starting to return to the top)...
...I use a small battery terminal brush to clean out the carbon. Then I blow it out with compressed air as shown.
You might have to do this a couple of times to get as much carbon loosened up and blown out as possible.  The next step after this is to reinstall the spark plug, find a spot where you will not catch anything on fire, and start the engine.  be forewarned, there will be sparks flying for a couple of minutes.  This is more carbon leaving the cylinder. Run the engine at full throttle for about a minute.

Reassemble the muffler assembly reversing the steps previously outlined and test again.  You will definitely hear a difference in the engine. Tightening the muffler down will force the metal piece back into place, if necessary.

This is written for an Echo string trimmer model SRM 266T.  Other makes and models look similar but essentially all work in the same manner.