The cold weather has hit the northeast united states, and with that, battery failures abound in your average automobile. Of course I cannot just get by with having to replace my battery, I instead have to replace the alternator in "trouble".
In my case, I noticed about a week ago that the blower motor sounded like it was losing power because it would spin slower than normal. As time went on, the ammeter gauge (this gauge shows you the voltage that is coming out of the alternator) would drop to minimum for a minute and then go back to normal, but at this time, the lights would dim, the blower motor would slow down, all signs that the alternator was not putting out enough voltage to run everything. It's time to diagnose and replace it.
Let me start by explaining how an alternator works:
Alternators started showing up in automobiles in the 1960's as a replacement for what was called a generator. An alternator works by spinning via the accessory belt (usually a serpentine belt that drives everything off of the crankshaft) and using a rotor spinning around a stator to produce AC voltage. The rotor has brushes on it that make contact with the stator and this whole process works off of the theory of using electromagnetism to produce voltage-thank you Nikola Tesla.
Alternator output is measured in amperes ("amps" or "amp"). The more demands are made on the electrical system, the higher the amperage required will be, and this will be discussed later in the article.
"But my car uses DC voltage!"-half the people that will read this if they know that fact.
Your alternator has a part called a rectifier that converts AC voltage into DC voltage. This voltage is then governed by a voltage regulator which allows an assumed maximum of 14.8 volts to go to the battery and the rest of the main electrical system. This does not mean that everything in your car gets the full 14.8 volts, it's just the amount of voltage available for charging the battery and running the vehicle. Some components use a mere 5 volts to operate, but that is a discussion for another day.
"So how do I check my charging system?" -half of the people that are still here instead of going to watch YouTube videos featuring cats.
The best way to check the charging system is by using a multimeter to see the voltage present in the system, I start by checking the battery with the engine off and I am looking for 12.3 to 12.6 volts. Place the leads of the multimeter directly on to the terminals and see what the voltage is, making sure that you have set the multimeter to DC. Regardless of the actual number, the next thing to do is to start the vehicle, let it run for a minute (especially in a vehicle with a diesel engine) and check the voltage available at idle. This number should be between 13.6 and 14.8 volts at the battery terminals.
Too high and you have a condition known as "overcharging" and you are risking damage to the vehicle's electronics. Too low and you are not charging the battery which can lead to being stranded as well as various components not working properly.
Another way to quickly check the alternator for operation is to, while the engine is running and without touching the wires coming out of the alternator, is to take a screwdriver and touch it to the back of the alternator's case. If it sticks (due to magnetism) then the alternator is functioning, though this may be at a very basic level. (Meaning that it may still not be producing enough voltage.) For this reason, I prefer the multimeter as a diagnostic tool in this case.
Let's talk about the battery for a minute:
If the battery is failing, one of the ways to tell at home is to check the voltage with the engine off. Again, using a multimeter, check to see if the voltage is between 12.3 and 12.6 volts. If it is not, then we need to determine why that is.
Presuming that using the charging test with the engine on showed a good charge, let's look at the battery itself. Are the terminals clean? Crusty green buildup is a surefire way to not have enough voltage going into the battery because of resistance. Is the battery itself clean? For fun, place the positive lead on to the positive terminal of the battery and place the negative lead onto the battery case itself. Is there voltage present? If there is, that is the electricity "crawling" across the battery, which can kill the battery as well. In these cases, disconnect the battery and clean up the terminals and/or the case. Is the battery cracked? Replace it and be careful when handling a damaged or dirty battery, as the corrosion and the fluid inside is acid, and it can burn your skin.
Lastly, 12 volt batteries are actually 12.6 volts at rest. They have six cells within the battery (three positive, three negative) that hold 2.1 volts each. So, let's say that you take your engine off measurement and come up with 10.5 volts. You most likely have a damaged cell, and it is battery replacement time. (I have an earlier write up on how to do this properly.) Another test that can be done, usually for free at any auto parts store, is to have the battery load tested. The test involves using a specialized tool that will measure the total amperage of the battery versus what it is supposed to have according to the label on the battery. While batteries in general for automobiles are supposed to have 12.6 volts, their amperage (which actually starts the vehicle) does vary depending on application. A four cylinder engine, for example, may only need 350 cranking amps to start, while a V8 equipped truck may need twice that amount, and diesel engines on big trucks may need north of 900 plus amps to turn the engine over.
Enough talk, let's swap out the alternator!
The cause of failure in my alternator was the regulator failing. As the regulator is built into the alternator, replacing the entire alternator is going to be the course of action that I will take. Other things that need to be checked are the battery cables and cables going into the alternator. You are looking for damage, including damaged insulation, loose cables/wires, outright failure of the cables (i.e. they are broken), corrosion, etc.
The first thing you need to do is to disconnect the battery cables from their terminals, starting with the negative terminal to prevent sparks. Some say that this is all you have to do to ensure not getting shocked by the battery, but I prefer to completely disconnect the battery to completely eliminate that possibility. The cables are not always red (positive) and black (negative) so if in doubt, mark where the cables were attached.
Second, release the serpentine belt (most common in today's vehicles) by moving the tensioner. Most cars and trucks have a belt diagram that shows you which pulley this is under the hood. If not, look for a pulley on a bracket with a square in it. Usually a breaker bar or ratchet end will fit into the square. Move the bracket to take the tension off of the belt and remove it from the alternator pulley while the tension is released. Do not let the belt catch your fingers between the belt and the pulley as this will hurt. Set the belt aside and try not to disturb the rest of the belt positioning, especially if there is no belt diagram.
Third, disconnect the cables from the alternator. There are usually two sets, the cable that allows power from the battery to go into the alternator and the set that distributes said power coming out of the alternator. These will be electrically "dead" if the battery was fully disconnected, so set them aside.
Fourth, unbolt the alternator from the engine. There are usually two or three bolts that hold it on, and they generally are installed in specific locations based on bolt length and sometimes bolt head size. Make a note of where they go and, once they are removed, remove the alternator.
Before the new alternator is installed, go ahead and clean up the battery terminals if needed. This can be done with a battery terminal brush or wire brush, cleaning up with water. Do not use baking soda and water because if the baking soda gets into the battery, it can ruin it.
Install your shiny new alternator, reattach the cables going into it, and reinstall your drive belt, making sure that the belt is fully seated onto the pullies. Reconnect your battery, starting with the positive cable first (to avoid sparks and such), then the negative cable. Start the engine and check the charging voltage. There should be the aforementioned 13.6 to 14.8 volts with the engine running at the battery terminals.
If you are still here reading, then let's discuss the amperage that an alternator can produce, and since you have found yourself interested in replacing your alternator, now is a good time to consider if you require more power (in amperage) out of it. Cases to consider would be if you have a big aftermarket stereo system in your car or if you have a truck with a lot of aftermarket lighting. Maybe you are building an ambulance with all sorts of lights and sirens, not to mention the additional power needed to run the back end of it, with all the emergency medical equipment in there. If any of this is the case, then maybe your stock amperage alternator will not handle the load required to power everything.
For example:
Let's say you have one of those little pocket rocket Japanese cars with at best a 90 amp alternator, but you added on the big aftermarket stereo, a pair of fog lights, an amplifier and a pair of giant subwoofers for the sole purpose of sharing your "music" with everyone in a ten block radius. Let's also say that while you have this 90 amp alternator, the electrical demands under normal circumstances are 80 amps. You now have ten amps left to power all the aftermarket items that were not taken into consideration by the manufacturer. If the alternator cannot meet the amperage demand, then you will see the lights dimming, your music may become more distorted than usual, and this can go as far as to create drivability complaints. One way to compensate for this is to go with a higher amperage output alternator.
With say, a 140 amp alternator, you now have 50 additional amps to run all the aftermarket items. Does the voltage increase? Well, no. The regulator will still hold things at 13.6 to 14.8 volts total availability. What this does mean is that the amperage will be available to not cause power losses, especially when the stereo is on, the aftermarket lights are on, etc.
A higher output alternator may also help with starting on a cold morning by increasing the total amps available to the starter initially. It is important to note that a 90 amp (or any amperage) alternator will not necessarily produce 90 amps all the time, but if the demand is present, it will increase as needed, generally determined by sensed load demand, usually determined by the vehicle's electronic control module (ECU).
So, what causes an alternator to fail?
In most cases from my experience, the most common cause of failure is age. An alternator has a few moving parts aside from the aforementioned rotor. They generally have bearings at either end, a cooling fan, a main shaft, etc. There are also windings and diodes within the assembly. All this being said, it is usually age that does an alternator in. Of course, if a diode ends up cracking or a bearing fails, this will shorten the life of an alternator significantly.
Is it possible to drive without an alternator?
Well, not for long because of all of the electronics found in today's automobile. The farther you try to drive without a working charging system, the more likely malfunctions are going to occur. This is because of the sheer amount of voltage required to actually run the car. Once systems start falling below their required voltages those systems will stop working properly, if they work at all..
Sunday, February 3, 2019

Sunday, October 14, 2018
The oil change tutorial!
My daughter recently asked me about changing the oil in a car, so, daughter, this is for you...
What you will need:
*The proper amount and type of oil. This information can be found in your owner's manual or online.
*The correct oil filter. This can also be found online and knowing your engine size helps.
*A drain pan that is used for oil and nothing else.
*A funnel.
*Gloves, either latex or nitrile.
*An oil filter wrench.
*The proper size socket or hand wrench to remove the oil drain plug.
*A jack and jack stands OR wheel ramps to get the car off the ground.
**OPTIONAL: a drip pan, which is a large pan that catches anything that might miss the oil drain pan.
(In my case, I needed six quarts of 5W30 oil and FRAM oil filter PH-16.)

Here are my supplies (minus the floor jack and funnel) ready to go. You can use wheel ramps if you wish. In any case make sure that whatever you are using is rated for the weight of the vehicle.
 Here you can see the jack stands doing their job. I left the floor jack in place as a sort of back up. Whatever you do, never rely on a floor jack or your vehicle's jack as the ole method of keeping your car in the air.


 Once all of the oil is out of the engine, you need to take a rag or paper towel and clean this off. You will also want to make sure that the gasket from the old filter is not still sticking to the engine. It is a round rubber ring and occasionally it will be stuck here.

 In the top picture I am applying a light coat of oil to the new gasket, which will not only help prevent it from sticking but it will also make the filter easier to remove the next time you change your oil. The bottom picture shows that this is, again, a light film of oil. Go ahead and attach the new filter, following the directions on the filter (usually 3/4ths of a turn once the gasket makes contact) and reinstall the drain plug.

What you will need:
*The proper amount and type of oil. This information can be found in your owner's manual or online.
*The correct oil filter. This can also be found online and knowing your engine size helps.
*A drain pan that is used for oil and nothing else.
*A funnel.
*Gloves, either latex or nitrile.
*An oil filter wrench.
*The proper size socket or hand wrench to remove the oil drain plug.
*A jack and jack stands OR wheel ramps to get the car off the ground.
**OPTIONAL: a drip pan, which is a large pan that catches anything that might miss the oil drain pan.
(In my case, I needed six quarts of 5W30 oil and FRAM oil filter PH-16.)

Here are my supplies (minus the floor jack and funnel) ready to go. You can use wheel ramps if you wish. In any case make sure that whatever you are using is rated for the weight of the vehicle.


After bringing the engine up to normal operating temperature the first thing I will do when I am changing the oil on any vehicle is to remove the oil cap on the engine. This is so that the oil will drain in a reasonable amount of time. If there is a whitish, brownish slime on the bottom of the cap this is just condensation and can be wiped off using a rag or paper towels.

On the underside of the engine, on the oil pan, you will find a bolt that looks kind of like this. This is the drain plug and it usually has a gasket on it. Make sure you have gloves on, and loosen the drain plug slowly. Have your catch pan ready, and remember that draining oil has a tendency to arc somewhat at first, so either have a huge pan or be ready to move the pan to keep the oil from getting on the ground. Remember that the oil is going to be HOT and it can burn you.
While you are under the vehicle it is a good time to look for things that are leaking and make note of them, if you are not going to repair them now.
 This is a typical canister oil filter. What that means is that it is a filter contained inside a metal housing with a gasket and a threaded insert at the end not shown to attach it to the engine. There are also cartridge filters, which are secured under a reusable cap but have no metal housing. These particular types of filters are not always necessarily on the bottom of the car. If you are unsure of which type of filter that you have, consult your owner's manual or a service manual.


Once the drain plug is installed and the filter installed, add the proper amount of oil to the engine through the oil fill cap opening. Two things of note here: One is that the engine in my truck has an opening wide enough that I do not need to use a funnel, and the second is note the position of the bottle. You will get a lot less splash back by pouring the oil this way. Also, I am aware that there is no oil coming out of the bottle, this is for illustrative purposes only.
Now, you get to clean up anything that might have spilled, any towels or rags, and of course the used motor oil. The old filter should be allowed to drain into a container (preferably the same container you are placing the used oil in to for recycling, and preferably overnight) and then the filter and any rags can be thrown away into the regular garbage. It is worth noting that disposing of used motor oil into the sewer or onto the ground is a crime and you can be prosecuted for it. Many auto parts stores will recycle your used oil for you (some places burn it for heat, and much of it is used to make home heating oil, believe it or not) but it is best to call ahead before just dropping it off.
Some points to make note of here:
Stick to well known brands of oil and filters. Personally I use Fram oil filters and Valvoline oil. I have used these since I have been driving (30 years and probably a dozen or more vehicles) and have never had a problem with either.
Use conventional motor oil. Synthetic oils should only be used if the engine in question has always used it. Synthetic oil can cause leaks in an engine that has never used it before because of the cleaning agents present in synthetics.
Just my opinion but there is no need to use $15.00 per quart oil in your $1000.00 shitbox.
Used motor oil is going to be a dark brown to black color. This is normal and is indicative of the oil doing its job. Not only does engine oil keep you engine lubricated but it also helps to prevent sludge and other buildup. How bad can build up get? Bad enough to ruin an engine. I remember doing a $150.00 oil change once you counted the flushing chemicals (glorified kerosene), filters and oil needed to get the sludge out, all because someone thought going 30,000 miles between oil changes was a good idea.
On the above note, follow the manufacturer's recommendations on oil changes, which can be found in the owner's manual. Some newer cars have oil life monitors in them which will tell you when to change the oil. You may have heard the old adage "three months or 3000 miles." Today's oil is better formulated and can go longer, but don't push it.
Tuesday, August 21, 2018
Drum Brake tutorial
Drum brakes. Some think of them as archaic technology from a bygone era of the first cars on the road. Others view them as an overly complicated brake type held together by too many parts that are too difficult to replace and maintain. I view them as the brakes that are not only found on the rear axles of many cars, even to this day, but they are also found on most semi trucks, even today.
Drum brakes operate on the same principle as disc brakes do, hydraulic pressure is used to operate the brakes generated by the brake pedal, except where a disc brake set up presses the brake pads into a rotor, drum brakes are operated through hydraulic pressure that actuates a wheel cylinder, which expands pins that press the shoes on to the inside of a brake drum. Brake drums are typically made of iron, and, like brake rotors, can be machined and reused until their maximum diameter is reached.
Drum brakes have more moving parts than a disc brake, including springs to retract, spacers, self adjusting parts, cables, etc. They have more parts, but I believe that if you take your time and have the right tools, you can do this yourself.
I would suggest that if you have any doubt as to your ability to do this job, you should consult a professional, as brakes are pretty important safety item and they need to work properly.
I recently had occasion to replace the drum brakes on my Durango, and I decided to document the process.
First thing is first, this is what you will need to do this job:
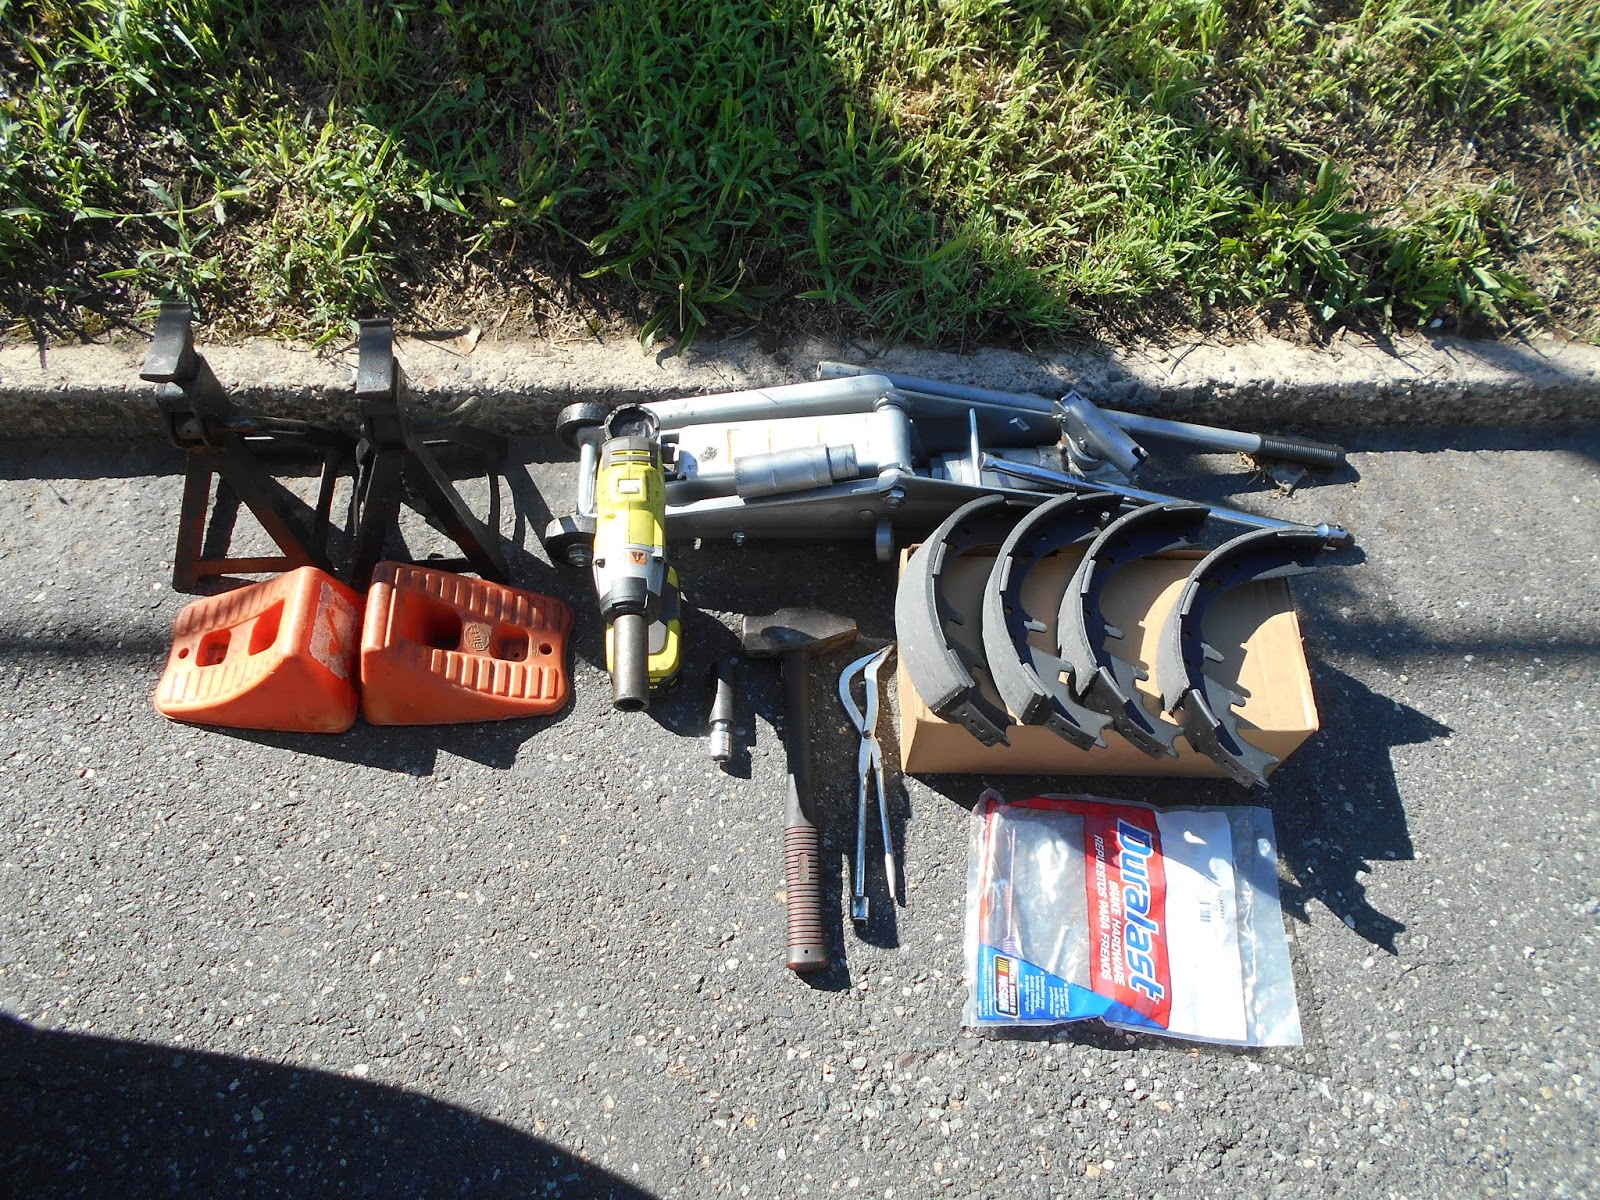
 I have here jack stands, a floor jack, wheel chocks, pliers (needle nose and standard), a brake tool (that has a spring tool, a tool for installing springs, etc.), a large hammer (not pictured), one small and one large screwdriver (also not pictured), and of course new brake shoes and brake hardware (springs, pins, etc.)
Set the wheel chocks on the front wheel to prevent movement, and raise the rear axle enough to spin the tires, then secure the rear axle on jack stands. Remove the tires, then remove the drums. Use the large hammer to smack the sides of the drum to aid in removal. This will help dislodge any rust or build up that might keep the drum stuck on the hub.. If the drum does not come off, you will need to spin the star wheel to retract the shoes. There is an access plug on the backing plate, usually covered by a rubber plug, which allows you to do this.


The next piece of the puzzle is to remove the parking brake cable and pivot assembly, as indicated by the arrows. This is simple to remove as at this point the cable can be removed with little effort. Set this aside as well. There is a part behind the cable eye that acts as a spacer between the cable and the shoes. This also, like almost everything else, needs to be removed.
Finally, remove the star wheel, parking brake pawl and their springs. Take note of a couple of things, most importantly its orientation and that it can be adjusted. If you are reusing the star wheel, my suggestion is that it be cleaned up and the threads lubricated, lightly, with either a WD-40 type oil or anti seize. Either will work but this needs to be applied sparingly,
Now for the reassembly...

When installing the new shoes, looking at the old ones, if you placed them on the ground as they appeared when you removed them, that will tell you how to position them. From there, installation is started by installing the pins, springs, and caps to hold the shoes in place. Next is the star wheel and spring used to keep the wheel from moving.
 Above is the star wheel (shown on the old shoes) which needs to be adjusted to its minimum length. It will be adjusted later in the procedure. Not pictured is the spring which is used to keep the wheel from adjusting itself. Additionally this is the time to reinstall the parking brake cable, pawl, and retainer spring.

Once the star wheel, parking brake pawl and their springs are installed, it is time to install this bar with the spring and spacer on one end between the shoes. There are notches in the shoes that these ends are installed into to hold it in place, just below the notches for the wheel cylinder pins.


Drum brakes operate on the same principle as disc brakes do, hydraulic pressure is used to operate the brakes generated by the brake pedal, except where a disc brake set up presses the brake pads into a rotor, drum brakes are operated through hydraulic pressure that actuates a wheel cylinder, which expands pins that press the shoes on to the inside of a brake drum. Brake drums are typically made of iron, and, like brake rotors, can be machined and reused until their maximum diameter is reached.
Drum brakes have more moving parts than a disc brake, including springs to retract, spacers, self adjusting parts, cables, etc. They have more parts, but I believe that if you take your time and have the right tools, you can do this yourself.
I would suggest that if you have any doubt as to your ability to do this job, you should consult a professional, as brakes are pretty important safety item and they need to work properly.
I recently had occasion to replace the drum brakes on my Durango, and I decided to document the process.
First thing is first, this is what you will need to do this job:
Set the wheel chocks on the front wheel to prevent movement, and raise the rear axle enough to spin the tires, then secure the rear axle on jack stands. Remove the tires, then remove the drums. Use the large hammer to smack the sides of the drum to aid in removal. This will help dislodge any rust or build up that might keep the drum stuck on the hub.. If the drum does not come off, you will need to spin the star wheel to retract the shoes. There is an access plug on the backing plate, usually covered by a rubber plug, which allows you to do this.

Above is the access hole for the star wheel.

And this (above) is the star wheel. The big flathead screwdriver will be used to push a spring back and the small screwdriver (also a flathead) will be used to spin the star wheel teeth. Generally, these need to be spun upwards, but if you are unsure, spin the star wheel and check to see if the drum moves at all. If it moves freely, you are going in the right direction. If the drum will not move, that's the wrong way. Now once the drum is removed, you will be looking at this:

As you can see, there are the springs I mentioned earlier. There are also pins that are held in place by springs and cap locks, the star wheel on the bottom, a parking brake cable, more springs, and the shoes. Not visible is the parking brake cable that runs from the assembly to the parking brake pedal in the passenger compartment.
The first things to get removed are the upper springs. Using the spring tool, place the tool over that top retaining pin (it's fixed in place) and rotate the tool, then pull back. The spring will come off. Repeat for the other spring. Set these aside for reference in a similar fashion to how they were arranged on the brake for reference.
 |
The top springs are first in line for removal.
|
 |
Using the tool to remove the spring.
 |
Next, use a pair of pliers or a brake spring tool to remove these caps. They are rotated so that the slots in the caps line up with the tabs on the pins. They can then be removed, along with the springs behind them. The pins slide out of the back of the mounting plate.
 Above is a close up of the pin retainer. Take note of the slot that is in the center, this is what will need to be aligned with the end of the pin that retains the spring and in turn, the brake shoe. The shoes may now be removed.


The next piece of the puzzle is to remove the parking brake cable and pivot assembly, as indicated by the arrows. This is simple to remove as at this point the cable can be removed with little effort. Set this aside as well. There is a part behind the cable eye that acts as a spacer between the cable and the shoes. This also, like almost everything else, needs to be removed.
Finally, remove the star wheel, parking brake pawl and their springs. Take note of a couple of things, most importantly its orientation and that it can be adjusted. If you are reusing the star wheel, my suggestion is that it be cleaned up and the threads lubricated, lightly, with either a WD-40 type oil or anti seize. Either will work but this needs to be applied sparingly,
Now for the reassembly...

When installing the new shoes, looking at the old ones, if you placed them on the ground as they appeared when you removed them, that will tell you how to position them. From there, installation is started by installing the pins, springs, and caps to hold the shoes in place. Next is the star wheel and spring used to keep the wheel from moving.


The above picture should give you an idea of where this spreader bar goes onto the shoes.
 Above is a retaining clip that also helps hold the brake shoe in place. install a new one at this time.

The next step is to install the cable inside the shoe between the pin at the top and the parking brake pawl on the inside of the shoes, do not forget the spacer on the top pin.
Finally, set up the top of the shoes with the wheel cylinder pins in their proper spaces.
To adjust the brakes so that they work (on all models that use brake drums):
You will need to expand the star wheel until the brake drum just barely fits over the shoes. When this is done correctly, you will hear a slight drag on the drum by the shoes. You can also adjust the shoes via the access slot on the back of the backing plate.
You can use this diagram below to reference the parts of the drum brake system.

- Front (leading) shoe.
- Rear shoe.
- Small upper spring (May vary depending on model.)
- Large upper spring (may vary by model.)
- Parking brake internal cable and pivot. (not shown-retainer for bracket.)
- Upper pin,
- Spacer (may not be present on all vehicles.)
- Spreader bar with spring and spacer/keeper.)
- Pin cap, spring(under cap) and retaining pin (under cap.)
- Lower spring.
- Star wheel.
- Parking brake pawl and cable connection..
- Pawl retaining spring.
- Backing plate.
Not pictured: retaining pins as described, star wheel access slot.
Monday, June 4, 2018
Paying someone versus doing it yourself part two: time management.
If there is anything I managed to learn over the past couple of years it is that there is nothing more valuable than time. Some people plan their day out with a checklist of things that absolutely must be done. Others, like myself, do not always have a set in stone plan but we know that there are things that have to be done for one reason or another (chores are a good example). Finally, there are those that have no plan whatsoever. Like dust in the wind they go wherever they are lead, much like sheep.
Time, being the most valuable commodity in existence, is just that because we are given a set amount of time on this earth (though no one really knows how long they have) and therefore it should not be wasted, or in some cases, spent doing one thing when you have several other things that need your attention. Since this is an automotive blog, I am going to cover the following example to illustrate my point:
You have a necessary repair that you have to do to your vehicle. Let's say for the sake of argument that it is a fuel pump replacement. You have almost every tool you need to make the repair, and you have searched out the pump for the best price you can get.
Now let's add in that this is the weekend, and in addition to having to replace your fuel pump, you also have housework to do. To top that off you have to do yardwork at someone else's house, and you are under the threat of impending rain. You do not have a garage to work in...
You have to weigh carefully the pros and cons of the decisions that you make.
In this case, your part is $230.00. You budget that it will take you about three hours to complete the repair and you plan to start at 8 in the morning. When that is done, off you go to do that yardwork at someone else's house, and that ends up taking another two hours. You then get back home and you cannot do your own yardwork because of the rain, so you instead have to put it off until tomorrow, which cuts into the plans you had for tomorrow. Wash, rinse, repeat. By the way, these are best guesses and nothing goes wrong scenarios. What would likely happen is that you go to drop the tank out of the vehicle, you get the tank stuck between the frame and the pavement, the tank refuses to budge, there is a thick black cloud of curse words hanging over your street, the nightmare goes on and on until you get rained on or one of the neighbors comes outside to bitch at you about what you are doing, and nothing else is done that day. As an added bonus, she's none too happy with you either for spending all that time making a repair that is incomplete.
The second option goes like this: You call around to a few garages and while your garage that does your annual inspection can do it for $500 (a bit steep) but cannot get to it until Monday, the new shop down the street is offering to get it done for $300 and can get it done the next day. (Both prices parts and labor.) So, you drop the vehicle off at 8am, on your way to do yardwork. Yardwork is complete, so you go home and do housework. Meanwhile, that phone call that your truck is complete comes, you go pick it up, test drive it, and then return home to complete whatever chores you have. As an added bonus, nobody is upset with you about anything chore related.
What you have done here, following the second example, is essentially pay someone $70 to install a fuel pump that you have already spent $230 on. You got everything else you needed to get done finished while someone else was replacing that pump (and that someone else has a lift, tools, and replacing your pump is the only thing they have to worry about.) For $70.00 you are a hero! You are a hero that got their chores completed! Yard work completed! As an added bonus she takes you out to breakfast the following morning! (Ok, that last one I think was going to happen regardless but chances are getting things accomplished helped make that happen...maybe.)
You have to be honest with yourself when tackling a project like this. Any project, really. Sure, you may have the tools, the talent, and the space to get it done, but do you really have the time?
A good rule of thumb to follow is to take whatever time you have allocated to a project and double it (or more) to ensure that it will get done when you say it will be done. You should probably do the same thing with the money involved as well. With regards to planning out the time, most of us work five days a week, sometimes more than that. That leaves us, realistically, two days to get things done around the house, spend time with loved ones, entertain ourselves, whatever it is we do on the weekends. Using my second example above, sure, you could do that job yourself, but you are gambling on the time involved and the loss of time for doing other things, and sometimes you have to ask if losing that time is really worth it.
Again with the time, my current job as a "builder" (I replace and maintain parts for vehicles sold by a national used car chain) I will often get jobs that total more than one day's work. (Over eight hours) I could either do one job at a time, or do them concurrently with one another. Let's use this example:
2013 Dodge Charger R/T needs the following repairs and services:
Machine front rotors (one hour allocated)-pulsation
Machine rear rotors (one hour allocated)-pulsation
Oil and filter change (30 minutes allocated)-maintenance required
Repair lower engine cover (30 minutes allocated)-cracked
Secure rear speaker ballast in trunk (10 minutes allocated)-loose
Secure plastic trim by left rear door (15 minutes allocated)-loose
Inspect vehicle for hidden/undocumented damage (15 minutes allocated)-standard procedure
oh, and my favorite...
Replace front subframe (6 hours allocated)-WTF??!?!
So, a total of 9.6 hours to get this car done. I could do these things one at a time, or plan out how to get this done efficiently. So, I choose to be efficient, and I do the work order like this:
On the ground, secure the ballast and secure the door trim, about fifteen minutes total.
(Time remaining 9.4 hours.)
Raise vehicle, drain oil while removing the rotors. Oil continues to drain while all four rotors go to the bench lathe for machining, about 90 minutes total.
(Time remaining 7.9 hours.)
Lower engine cover was stowed in the trunk, and after reinstalling the rotors, repair with epoxy and paint. Maybe 20 minutes total,
(Time remaining 7.6 hours.)
Replace sub frame that was damaged (this is what damaged the cover) with new frame. Nothing wants to come loose and when I finally get the main bolts off three out of four of them leak what can accurately (according to the smell) be described as RAW SEWAGE WATER on me. This wonderful part of the job took longer than the allocated time, by about an hour. I still have time left over, that if I was billing at flat rate, I would still get paid for. It's not much, maybe the equivalent of $15 bucks but imagine doing things quickly and efficiently like that all the time. It adds up.
The key to managing your time is just that...managing the time. Have a plan and stick to it. Know your limits, and when push comes to shove, consider that it is sometimes worth it to just farm it out to someone else, if for nothing else, to save yourself some time.
Time, being the most valuable commodity in existence, is just that because we are given a set amount of time on this earth (though no one really knows how long they have) and therefore it should not be wasted, or in some cases, spent doing one thing when you have several other things that need your attention. Since this is an automotive blog, I am going to cover the following example to illustrate my point:
You have a necessary repair that you have to do to your vehicle. Let's say for the sake of argument that it is a fuel pump replacement. You have almost every tool you need to make the repair, and you have searched out the pump for the best price you can get.
Now let's add in that this is the weekend, and in addition to having to replace your fuel pump, you also have housework to do. To top that off you have to do yardwork at someone else's house, and you are under the threat of impending rain. You do not have a garage to work in...
You have to weigh carefully the pros and cons of the decisions that you make.
In this case, your part is $230.00. You budget that it will take you about three hours to complete the repair and you plan to start at 8 in the morning. When that is done, off you go to do that yardwork at someone else's house, and that ends up taking another two hours. You then get back home and you cannot do your own yardwork because of the rain, so you instead have to put it off until tomorrow, which cuts into the plans you had for tomorrow. Wash, rinse, repeat. By the way, these are best guesses and nothing goes wrong scenarios. What would likely happen is that you go to drop the tank out of the vehicle, you get the tank stuck between the frame and the pavement, the tank refuses to budge, there is a thick black cloud of curse words hanging over your street, the nightmare goes on and on until you get rained on or one of the neighbors comes outside to bitch at you about what you are doing, and nothing else is done that day. As an added bonus, she's none too happy with you either for spending all that time making a repair that is incomplete.
The second option goes like this: You call around to a few garages and while your garage that does your annual inspection can do it for $500 (a bit steep) but cannot get to it until Monday, the new shop down the street is offering to get it done for $300 and can get it done the next day. (Both prices parts and labor.) So, you drop the vehicle off at 8am, on your way to do yardwork. Yardwork is complete, so you go home and do housework. Meanwhile, that phone call that your truck is complete comes, you go pick it up, test drive it, and then return home to complete whatever chores you have. As an added bonus, nobody is upset with you about anything chore related.
What you have done here, following the second example, is essentially pay someone $70 to install a fuel pump that you have already spent $230 on. You got everything else you needed to get done finished while someone else was replacing that pump (and that someone else has a lift, tools, and replacing your pump is the only thing they have to worry about.) For $70.00 you are a hero! You are a hero that got their chores completed! Yard work completed! As an added bonus she takes you out to breakfast the following morning! (Ok, that last one I think was going to happen regardless but chances are getting things accomplished helped make that happen...maybe.)
You have to be honest with yourself when tackling a project like this. Any project, really. Sure, you may have the tools, the talent, and the space to get it done, but do you really have the time?
A good rule of thumb to follow is to take whatever time you have allocated to a project and double it (or more) to ensure that it will get done when you say it will be done. You should probably do the same thing with the money involved as well. With regards to planning out the time, most of us work five days a week, sometimes more than that. That leaves us, realistically, two days to get things done around the house, spend time with loved ones, entertain ourselves, whatever it is we do on the weekends. Using my second example above, sure, you could do that job yourself, but you are gambling on the time involved and the loss of time for doing other things, and sometimes you have to ask if losing that time is really worth it.
Again with the time, my current job as a "builder" (I replace and maintain parts for vehicles sold by a national used car chain) I will often get jobs that total more than one day's work. (Over eight hours) I could either do one job at a time, or do them concurrently with one another. Let's use this example:
2013 Dodge Charger R/T needs the following repairs and services:
Machine front rotors (one hour allocated)-pulsation
Machine rear rotors (one hour allocated)-pulsation
Oil and filter change (30 minutes allocated)-maintenance required
Repair lower engine cover (30 minutes allocated)-cracked
Secure rear speaker ballast in trunk (10 minutes allocated)-loose
Secure plastic trim by left rear door (15 minutes allocated)-loose
Inspect vehicle for hidden/undocumented damage (15 minutes allocated)-standard procedure
oh, and my favorite...
Replace front subframe (6 hours allocated)-WTF??!?!
So, a total of 9.6 hours to get this car done. I could do these things one at a time, or plan out how to get this done efficiently. So, I choose to be efficient, and I do the work order like this:
On the ground, secure the ballast and secure the door trim, about fifteen minutes total.
(Time remaining 9.4 hours.)
Raise vehicle, drain oil while removing the rotors. Oil continues to drain while all four rotors go to the bench lathe for machining, about 90 minutes total.
(Time remaining 7.9 hours.)
Lower engine cover was stowed in the trunk, and after reinstalling the rotors, repair with epoxy and paint. Maybe 20 minutes total,
(Time remaining 7.6 hours.)
Replace sub frame that was damaged (this is what damaged the cover) with new frame. Nothing wants to come loose and when I finally get the main bolts off three out of four of them leak what can accurately (according to the smell) be described as RAW SEWAGE WATER on me. This wonderful part of the job took longer than the allocated time, by about an hour. I still have time left over, that if I was billing at flat rate, I would still get paid for. It's not much, maybe the equivalent of $15 bucks but imagine doing things quickly and efficiently like that all the time. It adds up.
The key to managing your time is just that...managing the time. Have a plan and stick to it. Know your limits, and when push comes to shove, consider that it is sometimes worth it to just farm it out to someone else, if for nothing else, to save yourself some time.
Saturday, April 28, 2018
The continuing adventures of Dale D. Mehcanic.
Over one hundred individual readers are aware that on January 4, 2016, I started working for a medium sized landscaping company in South Jersey. What most of you do not know is that on March 23, 2018, this job came to an end.
Originally I had written out this long post about how this was a stupid decision on their part, and about how they should not be such a bunch of snowflakes. I even went as far as to say that my (fake) grandson cries less than they do collectively, Instead, I am going to say that they made their bed, now they can sleep in it. I will also say that as of this writing they have NO mechanics on staff. Karma is a bitch guys.
It took me two weeks to start working again. I now work for a company that sells refurbished, used cars. It is a national company, and to be honest, it is nothing like I had expected. I had expected a somewhat shady operation where the cars might run, might not, and had envisioned their buyers as these guys with the eye patch and ponytail, their salesmen as the fat slobs in the cheap suits, and the boss being from Ukraine or Russia or some such nonsense. Nope, none of that.
Instead, the company checks out the car end to end, and my part in the process is to repair what needs to be repaired and replace what needs to be replaced. They call it "building" the car. They were also kind enough to hire me as a level two technician.
When I was interviewed, by this and every other place I went to looking for a job, I admitted that I had been let go from the last job, and why (both versions-those being their excuse and what I believe to be the real reason.) The new company asked me if I had learned anything from this experience, and my response was that I used to send what I considered to be important emails to myself at a rate of about 60% or so (things like serious truck problems, inspection reminders, readiness reports, etc.) and that now I keep notes and emails on EVERYTHING. The guy that did my interview said I had a "good aura". I was hired on the spot pending a negative drug test (no worries) and background check.
So, the perks of my job are (versus the last one)
*I have my own lift, versus jack stands and a floor jack.
*I work eight hours a day and I am paid overtime, versus salary and 70-75 hour weeks.
*I do not get a car to build unless I have all the parts, versus a toss up.
*People here are too busy to start shit and make problems, versus drama and snowflake bullshit.
*Most people are like minded in that we just want to work,
*My boss is a mechanic, versus a boss that pushes pencils and has ideas that make no sense in my world..
*I have access to brake lathes, tire machines (mount and balance) versus practically nothing.
*I have access to drain pans on wheels, specialty tools, scanners, versus whatever I had.
*The job is closer to home, and they are moving, old company was farther.
*The most important perks-I am home and the sun is still out and since tax season is done, NO SATURDAYS! Also, I all around feel better.
So, here I am on a Saturday, chores are completed, and now I can do things that I want to do, like write this blog when ordinarily, I would be at work. I read somewhere that if it costs you your peace, it's too expensive. This is a fact.
Originally I had written out this long post about how this was a stupid decision on their part, and about how they should not be such a bunch of snowflakes. I even went as far as to say that my (fake) grandson cries less than they do collectively, Instead, I am going to say that they made their bed, now they can sleep in it. I will also say that as of this writing they have NO mechanics on staff. Karma is a bitch guys.
It took me two weeks to start working again. I now work for a company that sells refurbished, used cars. It is a national company, and to be honest, it is nothing like I had expected. I had expected a somewhat shady operation where the cars might run, might not, and had envisioned their buyers as these guys with the eye patch and ponytail, their salesmen as the fat slobs in the cheap suits, and the boss being from Ukraine or Russia or some such nonsense. Nope, none of that.
Instead, the company checks out the car end to end, and my part in the process is to repair what needs to be repaired and replace what needs to be replaced. They call it "building" the car. They were also kind enough to hire me as a level two technician.
When I was interviewed, by this and every other place I went to looking for a job, I admitted that I had been let go from the last job, and why (both versions-those being their excuse and what I believe to be the real reason.) The new company asked me if I had learned anything from this experience, and my response was that I used to send what I considered to be important emails to myself at a rate of about 60% or so (things like serious truck problems, inspection reminders, readiness reports, etc.) and that now I keep notes and emails on EVERYTHING. The guy that did my interview said I had a "good aura". I was hired on the spot pending a negative drug test (no worries) and background check.
So, the perks of my job are (versus the last one)
*I have my own lift, versus jack stands and a floor jack.
*I work eight hours a day and I am paid overtime, versus salary and 70-75 hour weeks.
*I do not get a car to build unless I have all the parts, versus a toss up.
*People here are too busy to start shit and make problems, versus drama and snowflake bullshit.
*Most people are like minded in that we just want to work,
*My boss is a mechanic, versus a boss that pushes pencils and has ideas that make no sense in my world..
*I have access to brake lathes, tire machines (mount and balance) versus practically nothing.
*I have access to drain pans on wheels, specialty tools, scanners, versus whatever I had.
*The job is closer to home, and they are moving, old company was farther.
*The most important perks-I am home and the sun is still out and since tax season is done, NO SATURDAYS! Also, I all around feel better.
So, here I am on a Saturday, chores are completed, and now I can do things that I want to do, like write this blog when ordinarily, I would be at work. I read somewhere that if it costs you your peace, it's too expensive. This is a fact.
Friday, January 12, 2018
Wheel hub bearing replacement
The first time I went to engage the four wheel drive on Trouble this winter season I was greeted with a popping, clicking sound. Upon examining the source, I determined that the wheel bearing had gone bad and the noise was being caused by the added stress of the four wheel drive system. I also discovered that the half shaft was binding up too, but I am going to cover that in another post.
Replacing a wheel bearing is not that hard, usually. But there are some tools that you will need to get the job done correctly, and they are (specific to my truck):
*1/2" breaker bar
*1/2" impact wrench (optional)
*32mm socket (deep well preferred)
*9/16" socket
*1/2" ratchet
*1/2" torque wrench
*anti-seize compound
*Loctite blue
*T47 torx bit (sometimes called a star bit)
*3/8" ratchet
*Large hammer
*Pliers
*Replacement cotter pin (if not included in the replacement hub assembly)
Step one is to remove the wheel, and then the brake rotor and caliper. Dodge Durangos and Dakotas of this generation use a bolt that requires a T47 torx bit to remove and install. All nuts and bolts should be set aside and organized so that they do not get lost. When this is completed, this is what you will be looking at.

This is the front wheel bearing/hub assembly on the driver side of the truck.
The next step will be to remove the cotter pin, then the cap that is held on by the cotter pin. Discard the cotter pin. Set the cap and the wave washer directly behind it to the side. Using an impact wrench and the 32mm socket, remove the axle nut, and the thick washer behind it, and set those aside. Your wheel hub should now look like this:


Using a wire brush, clean up the hole where the hub flange will fit into, then add a small amount of anti-seize to the inside of the hole. Anti-seize is used to prevent metal parts from rusting and sticking together, making disassembly easier (in theory)

Replacing a wheel bearing is not that hard, usually. But there are some tools that you will need to get the job done correctly, and they are (specific to my truck):
*1/2" breaker bar
*1/2" impact wrench (optional)
*32mm socket (deep well preferred)
*9/16" socket
*1/2" ratchet
*1/2" torque wrench
*anti-seize compound
*Loctite blue
*T47 torx bit (sometimes called a star bit)
*3/8" ratchet
*Large hammer
*Pliers
*Replacement cotter pin (if not included in the replacement hub assembly)
Step one is to remove the wheel, and then the brake rotor and caliper. Dodge Durangos and Dakotas of this generation use a bolt that requires a T47 torx bit to remove and install. All nuts and bolts should be set aside and organized so that they do not get lost. When this is completed, this is what you will be looking at.

The next step will be to remove the cotter pin, then the cap that is held on by the cotter pin. Discard the cotter pin. Set the cap and the wave washer directly behind it to the side. Using an impact wrench and the 32mm socket, remove the axle nut, and the thick washer behind it, and set those aside. Your wheel hub should now look like this:

Now, with the brake caliper sitting where it would be normally (to prevent damaging the brake line), turn the wheel and locate the three bolts with the heads facing the inside of the hub assembly. They have 9/16" heads but are larger with respect to the threaded portion. Using a breaker bar to get them loose at first, remove the three bolts. You will probably have to turn the steering wheel to access all of the bolts. The hub is now ready for removal. Using the large hammer, hit the rounded portion of the hub to break it free. This may take several attempts to accomplish. You may also want to lightly tap the end of the axleshaft, but if you choose to do this, reinstall the axle nut so that it is sitting flush with the threads as to avoid damaging them. When this is done, you will be looking at this:


I purchased a First Equipment Quality (FEQ) brand replacement wheel hub assembly. You will notice that the lug studs are already attached to the hub, and that the hub is one complete assembly. It is possible to just replace the bearing portion of the assembly, but by the time you are finished paying someone to press out the old bearing and install the new one it's going to add up. I prefer complete assemblies due to the time factor. The most valuable commodity in the universe is time.
To install the hub, using your hands only (no hammers) place the hub into the hole and line up the bolt holes on the flange to the spindle. Apply Loctite to the bolt threads. Start the three bolts into the flange but do not tighten them up just yet as you will need to again turn the wheel to get access to all of the bolt holes. Once the bolts have been started, tighten the bolts that retain the hub to 90 foot pounds using the torque wrench. Do not guess, do not assume they are tight enough. Use a torque wrench.
Install the large washer and axle nut and tighten to 175 foot pounds. Loctite is not required as a cotter pin is used to help keep the nut from backing off. Again, do not guess the torque. If there is not enough torque on the nut, the axle will shimmy around and it may fail. Too much torque and the bearing will burn itself out prematurely due to excess friction, which causes heat.
Install the wave washer, castle cap and a new cotter pin. The picture below shows the proper way to bend a cotter pin to prevent it from falling out.

The final steps involve reinstalling the brake rotor, caliper and wheel. Road test the vehicle and listen for any odd sounds coming from the driveline. This is the part where I felt the axle bind up when testing the four wheel drive. This will end up being the next post, wherein I replace the axle, hopefully before the next major snow.

Saturday, August 5, 2017
Changing the Ford Triton spark plugs
I could have called this entry "The definitive reason why I don't like fords" or "FoMoCo shit engineering" (but that would be more of a book than a blog post) but instead the title is the title and after reading this you might understand (and in a few cases I have said) that it's not necessarily the vehicle I dislike, but some of the engineering that went into it. The biggest thing I do not like about the 4.6L, 5.4L, and 6.8L triton engines with three valves per cylinder is that the plugs have a tendency to break off in the cylinder head. The earlier engines with two valves per cylinder have a tendency to spit the plugs out, and take the coil out in the process.
At any rate, to do this job you will need the following tools:
3/8 ratchet, and extensions (3", 6", a 3/8" swivel attachment.)
A 9/16" deepwell socket. You can get a 9/16" spark plug socket but they are hard to find.
A 5/8" socket.
A 3/4" socket, deepwell.
A 3/4" wrench.
A 7/8" socket, deepwell.
Penetrating oil. (I use and recommend PB Blaster)
A 7mm socket.
A 8mm socket.
A magnet and/or a parts grabber.
A pair of needle nose pliers.
A six to eight inch length of 3/8"ID hose
Copper (high temperature) anti-seize.
A kit specifically made for extracting broken plugs from Triton three valve engines. Do NOT attempt this procedure without it.
I started with the driver's side of the engine for this procedure.
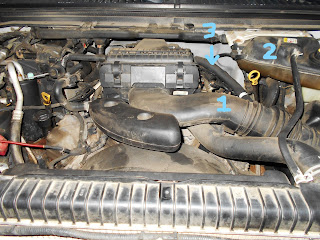
Step one: remove the air intake hose between the front of the truck and the throttle body.
Step two: unbolt and set aside the degas bottle mounted the firewall.
Step three is to remove the line running from the intake to the valve cover.
Step four: Using the 7mm socket, remove the bolt that holds the coil in place. Immediately place the bolt aside where it will not get lost or worse, find it's way into the combustion chamber.
Step five: Grab the top of the coil, and with a twisting motion, pull the coil off of the plug. (These engines use a coil on plug ignition system, meaning there is one coil per plug.) If the rubber boot should happen to stay on the spark plug, use the needle nose pliers to twist the boot and remove it. It should be notes that these coil packs snap together so if the boot is separated from the coil pack housing itself, it's not the end of the world.
Repeat steps four and five for the rest of the coils on this side.
Step six: Spray some penetrating oil into the spark plug recesses. Let it work for a minimum of thirty minutes. Use this time to remove the coils from the passenger side of the engine, then spray the penetrating oil into those plug recesses.
Step seven: Using the 9/16" socket, ratchet and extensions as needed, remove the plugs from the cylinder head. Be warned, these plugs will be very tight. Go slow, take your time.
Step eight (assuming the plug stayed together): if the plug falls out of the socket upon extraction, Use the magnet to snag the top of the spark plug and carefully pull it out of the recess. if the plug was broken off remove the portion of the plug that is loose.
Step nine: If any of the plugs were broken off, use the extraction tool to get the broken pieces out.
Step ten: Now that the plugs are free of the cylinder, apply the copper anti-seize to the plug threads and the area immediately below the threads. Place the hose over the top of the plug, and use the hose to start threading the plug into the cylinder head. This method prevents cross threading.
The passenger side removal is almost the same as the driver side, with the only real exceptions being some vacuum lines that you can remove to make this job a little bit easier. Some other things that others have tried to make plug removal easier include:
-Let the engine run long enough to get warm.
-Soak the plugs in the block in penetrating oil overnight.
-run one bottle per tank of seafoam for two tanks of gas to clean the carbon off of the plugs.
-Pay someone to do this for you. (But at around $450.00 that's kind of expensive.)
At any rate, to do this job you will need the following tools:
3/8 ratchet, and extensions (3", 6", a 3/8" swivel attachment.)
A 9/16" deepwell socket. You can get a 9/16" spark plug socket but they are hard to find.
A 5/8" socket.
A 3/4" socket, deepwell.
A 3/4" wrench.
A 7/8" socket, deepwell.
Penetrating oil. (I use and recommend PB Blaster)
A 7mm socket.
A 8mm socket.
A magnet and/or a parts grabber.
A pair of needle nose pliers.
A six to eight inch length of 3/8"ID hose
Copper (high temperature) anti-seize.
A kit specifically made for extracting broken plugs from Triton three valve engines. Do NOT attempt this procedure without it.
 |
This is the Ford Triton Engine spark plug removal tool. Don't attempt this procedure without this kit.
|
I started with the driver's side of the engine for this procedure.

Step one: remove the air intake hose between the front of the truck and the throttle body.
Step two: unbolt and set aside the degas bottle mounted the firewall.
Step three is to remove the line running from the intake to the valve cover.
Step four: Using the 7mm socket, remove the bolt that holds the coil in place. Immediately place the bolt aside where it will not get lost or worse, find it's way into the combustion chamber.
Step five: Grab the top of the coil, and with a twisting motion, pull the coil off of the plug. (These engines use a coil on plug ignition system, meaning there is one coil per plug.) If the rubber boot should happen to stay on the spark plug, use the needle nose pliers to twist the boot and remove it. It should be notes that these coil packs snap together so if the boot is separated from the coil pack housing itself, it's not the end of the world.
Repeat steps four and five for the rest of the coils on this side.
Step six: Spray some penetrating oil into the spark plug recesses. Let it work for a minimum of thirty minutes. Use this time to remove the coils from the passenger side of the engine, then spray the penetrating oil into those plug recesses.
Step seven: Using the 9/16" socket, ratchet and extensions as needed, remove the plugs from the cylinder head. Be warned, these plugs will be very tight. Go slow, take your time.
Step eight (assuming the plug stayed together): if the plug falls out of the socket upon extraction, Use the magnet to snag the top of the spark plug and carefully pull it out of the recess. if the plug was broken off remove the portion of the plug that is loose.
Step nine: If any of the plugs were broken off, use the extraction tool to get the broken pieces out.
Step ten: Now that the plugs are free of the cylinder, apply the copper anti-seize to the plug threads and the area immediately below the threads. Place the hose over the top of the plug, and use the hose to start threading the plug into the cylinder head. This method prevents cross threading.
 |
The copper colored stuff on the plug is high temperature anti-seize. This will go a long way towards keeping the plugs from breaking off in the cylinder head when you do this again. Also note the heater hose on the end of the plug. Once the spark plug is threaded into the cylinder head a couple of turns this hose will twist off of the plug.
|
The passenger side removal is almost the same as the driver side, with the only real exceptions being some vacuum lines that you can remove to make this job a little bit easier. Some other things that others have tried to make plug removal easier include:
-Let the engine run long enough to get warm.
-Soak the plugs in the block in penetrating oil overnight.
-run one bottle per tank of seafoam for two tanks of gas to clean the carbon off of the plugs.
-Pay someone to do this for you. (But at around $450.00 that's kind of expensive.)
 |
The plug on the left is the new plug, the one on the right was in the engine way too long, as shown by the worn electrode.
|
 |
| This picture shows where the plug has a tendency to break off. Again, you will not get the broken off piece out of the head without the special kit. |
 |
| Here are all eight of the plugs out of the engine...I only broke three of them (new personal record). |
Subscribe to:
Posts (Atom)