Going to begin at the beginning on this one...
Wednesday we get a lot of rain in the area. By a lot, I mean over four inches in some spots, but most of us got about three and a half or so. So, it rained and apparently people got real scared because their shit cars might float away or whatever, and so they apparently forgot how to read road signs, like the merge signs. Long story short, the duck got overheated. I didn't think anything of it, because it will do this from time to time.
Thursday comes and the aftermath of rain in larger amounts is realized when the road to my job is blocked off and I am watching the temperature gauge rise. I try to find another route into work and all of a sudden I am greeted with a brand new top speed of about 40 MPH and the duck is running like total shit! yep, something is wrong.
finally I get to work, work my shift, get back to my truck (had to park it down the road and walk through knee high water) and decide to check the coolant...not too much in there. I then check the oil...and I find white slime...so it is head gasket replacement time!
No pictures this time, but here is the breakdown of findings and actions taken:
1.) Order a head gasket kit from advance auto parts. Spend $41.00
2.) Call about a dozen places before calling Dick Greenfield Dodge for head bolts. Spend $59.00
3.) Get two oil filters, 8 quarts of oil and engine flush. Spend $50.
4.) Get antifreeze, spend another $20
The idea is that since the oil is severely contaminated I am going to change the oil, add the engine flush (also known as very overpriced kerosene), run it for a few minutes and change it all again. Well, the first thing you have to do when you are replacing a head gasket is set aside a LOT if time to get it done. Essentially to replace the head gasket you have to take the top end of the engine apart, and frankly the duck has sounded like it is going to rattle something loose for some time now, so I decided when I ordered the head gasket kit that I would look into that, seeing as how it is all coming apart anyway.
Discovery one: There are broken bolts on the manifold. Dodge says that this will not affect performance adversely. My opinion is that if there is a broken bolt on the engine that it needs to be fixed.
Discovery two: All the remaining bolts on the manifolds are LOOSE. WTF?
So, after relieving the fuel pressure and removing the intake manifold, I find that there is shit all through the intake that looks like burnt on oil and oh, look, the cylinder head is full of it too. The exhaust manifold is devoid of burnt shit but closer inspection reveals that where there is supposed to be exhaust/intake gasket, there is none.
The intake and exhaust manifolds are separate pieces that take up space on the same side of the head. Just like a Jeep 2.5 liter. By now you should have realized that the duck, like every other four cylinder Dakota of 1996 vintage, does NOT have a dodge engine in it. This is a JEEP engine. to be precise, it is the AMC 2.5 liter. To that end, if you are like me and go to autozone.com for instructions and torque settings you had better be sure what you are looking at. In this case, enter your vehicle as a 1996 Cherokee with a 2.5 liter and follow those instructions. The instructions used for the Dakota on autozone.com are based on an overhead cam engine.
So, day one, after getting my gaskets and head bolts, I drain all the remaining antifreeze out of the block (which was not much) and relieve the fuel pressure. I then start tagging the many electrical connections found mostly on the intake and throttle body, and then proceed to begin to remove the intake and exhaust manifolds. This is about the time I discovered the looseness of every bolt on the combination manifold and find that the bolt closest to the front of the truck, and the one furthest from, are snapped off. What was even more fun is that when I removed the exhaust manifold (actually it just kind of fell off) was that the portion of the gasket that was supposed to be between the head and the exhaust was not there. Not as an assembly mistake, but more of a purposeful deletion, as the gasket for the intake and exhaust is one big piece...
Moving on, I then removed the valve cover and found white slime all over the rocker arms. This pretty much means that the oil contamination is as bad as expected. I finished the day by starting the disassembly process of the intake manifold and soaking the valve cover in degreaser.
Sunday morning, because the bolts on the head itself are 12 points, I go to home depot to get the appropriate set of sockets (more money) and this is when I pick up my antifreeze and yet more oil (more money). About 9 am I finally get the head removed from the truck. Here is a tip: when you remove the pushrods, do yourself a favor and get a shoebox, poke eight holes in it, and label one end of the box "FRONT". When you remove the pushrods, put them through the holes in the order and position you remove them from the block. Keep the rocker arms in the same order. This will keep these things in the same position and make life easier, as these things wear over time, and you want to keep them wearing at the same rate, because frankly you will spend another 200 to 300 dollars to get new ones.
The valve cover gets cleaned up and repainted a nice low gloss black while the intake and cylinder head are cleaned out. Why cleaned out? The cylinder head had loads of white slime in it, and the intake manifold (and head intake ports) had loads of baked on shit in them. While I used degreaser to clean them up, followed by hot water to flush and WD-40 on the head to dispel water, a dip tank or something else caustic would have worked better, especially for the intake manifold.
I took this time to extract the broken bolts from the head. Nothing really pretty about it, just a drill bit and a set of extractors. valve cover gets another coat of paint.
After cleaning the block up with brake parts cleaner, rags, and a razor blade I decided to install the new throttle body gasket and give the valve cover another coat of paint. A final cleanup of the block and I was reinstalling the head, using the new head gasket. The instructions say to use two old, long head bolts to keep the gasket oriented to the block, but I instead used a small amount of gasket maker to keep the gasket from sliding around while the head was placed back on the block. A couple of bolts later-LOOSELY installed- and I was torqueing the bolts down properly. After reinstalling the rockers and pushrods, I then installed the exhaust manifold, followed by the intake. Valve cover gets its third or fourth coat of low gloss black while this is going on.
Finally, the valve cover gets installed with its new gasket, electrical connections are made, and the truck is jacked up into the air so the oil and water combo huge mess can be drained. Overpriced kerosene gets dumped in along with four quarts of oil and a new filter. antifreeze is added and I start the truck up. five minutes later the oil is drained, not as white, but definitely not something you want in the block. fresh oil and a new filter are installed, and the truck gets a final checkover of all connections, vacuum lines, and other odds and ends. I then go for a short test drive, and I see steam coming from the front where I managed to boil over antifreeze and get that all over the radiator.
So, the grand total would go something like this, excluding tools purchased:
Gasket set from advance auto parts: $41.00
Head bolts from Dodge: $59.00
Oil $24.
Filters: $10
Loctite red: $8
sealant: $7
Coolant:$20
Motor flush: $6
Degreaser: $9
The grand total of me doing this myself: $184.00, again not counting tools purchased.
The shop average estimate: $1100
My savings: $916
Wednesday, May 7, 2014

Wednesday, April 9, 2014
Ignition failure at 7 am...
So I go out to the truck to go to work like almost every day since I bought the thing, except the car gods were not in a good mood this morning, or some trolls cursed it. I turn the key and nothing...
Nothing is never good when you are trying to get a vehicle started. First thing I do is call the boss, who seemed ok with my missing a day of work, but we shall see, and next inform my girlfriend that the duck has decided to take the day off.
First, I decide to verify the electrical system integrity, which involves checking the fuses (ok), wiring to the starter (also ok) and power to the alternator (also ok), so at this point, I am thinking it is the switch itself. I get back in the truck and try it again...nothing. I noticed that the switch is not springing back to the "on" position after being turned to "start", "off" works well and "acc" is hit or miss. I deduce that it is indeed the switch.
Now I have to get the switch out of the steering column, and all goes well until I break the plastics that surround the key switch (longer screws and glue will fix this). I then try to remove the ignition assembly...and this is when I realize that ma mopar decided to use security screws here.
A trip to the auto parts store around the corner and I have the right tools to remove the switch, and so it comes out, just in time for me to discover that I cannot take the lock cylinder out of the switch itself. I do, however, discover that while the key is moving to the "start" position, the rest of the assembly is not.
If you go to www.autozone.com and enter your vehicle information, and then search a part, that site is kind enough to tell you what other vehicles use that same part. This helps because the switch new at the dodge stealership is around $110, plus key cutting and coding if applicable. Not today. I am on a budget like most of the people I know and $110 just is not in the budget. That being said, I made a list of vehicles that take this same key switch assembly, and in my case, lots of Chrysler products take the same assembly. This gives me a list of donors, that includes a 1996 Dodge Viper. Of course the plan is to go to the local salvage yards and find one, hopefully with a key.
My friend Kenny was not doing anything today and was kind enough to act as chauffeur to get me to a couple local salvage yards. First off was crescent U pull it, who had nothing in the way of viable key switches (but did have a decent set of bucket seats that will bolt right in). second up was junkyard Barbie, who had a few candidates, but no keys. I decided to call up Reedman Toll Dodge and ask if they could cut a key based on VIN number. I also had to explain that I could not provide a registration for the donor vehicle since it is sitting in the middle of a salvage yard. The nice people at the stealership told me to bring in the VIN from the donor, my registration, identification, and they could cut me a key.
$30 later I have a key...that will not work.
Being pissed at this point and not willing to admit defeat, Kenny brings me home, where I decide that sometimes you have to use finesse and charm to get things accomplished. sometimes you have to use a hammer. Today being a hammer kind of day I tapped the key a few (dozen) times, until it worked in the lock. About half an hour after the hammering (and the bulk of my day shot) I can finally drive the duck again.
So, in hindsight...
*Don't break your ignition switch.
*Don't expect a salvage yard ignition switch to work "out of the box".
*$30 for a key is bullshit.
*Seems to me I owe Kenny some beer.
*It would be really cool to be able to say I have Viper parts in my truck (and not in the bed).
Nothing is never good when you are trying to get a vehicle started. First thing I do is call the boss, who seemed ok with my missing a day of work, but we shall see, and next inform my girlfriend that the duck has decided to take the day off.
First, I decide to verify the electrical system integrity, which involves checking the fuses (ok), wiring to the starter (also ok) and power to the alternator (also ok), so at this point, I am thinking it is the switch itself. I get back in the truck and try it again...nothing. I noticed that the switch is not springing back to the "on" position after being turned to "start", "off" works well and "acc" is hit or miss. I deduce that it is indeed the switch.
Now I have to get the switch out of the steering column, and all goes well until I break the plastics that surround the key switch (longer screws and glue will fix this). I then try to remove the ignition assembly...and this is when I realize that ma mopar decided to use security screws here.
A trip to the auto parts store around the corner and I have the right tools to remove the switch, and so it comes out, just in time for me to discover that I cannot take the lock cylinder out of the switch itself. I do, however, discover that while the key is moving to the "start" position, the rest of the assembly is not.
If you go to www.autozone.com and enter your vehicle information, and then search a part, that site is kind enough to tell you what other vehicles use that same part. This helps because the switch new at the dodge stealership is around $110, plus key cutting and coding if applicable. Not today. I am on a budget like most of the people I know and $110 just is not in the budget. That being said, I made a list of vehicles that take this same key switch assembly, and in my case, lots of Chrysler products take the same assembly. This gives me a list of donors, that includes a 1996 Dodge Viper. Of course the plan is to go to the local salvage yards and find one, hopefully with a key.
My friend Kenny was not doing anything today and was kind enough to act as chauffeur to get me to a couple local salvage yards. First off was crescent U pull it, who had nothing in the way of viable key switches (but did have a decent set of bucket seats that will bolt right in). second up was junkyard Barbie, who had a few candidates, but no keys. I decided to call up Reedman Toll Dodge and ask if they could cut a key based on VIN number. I also had to explain that I could not provide a registration for the donor vehicle since it is sitting in the middle of a salvage yard. The nice people at the stealership told me to bring in the VIN from the donor, my registration, identification, and they could cut me a key.
$30 later I have a key...that will not work.
Being pissed at this point and not willing to admit defeat, Kenny brings me home, where I decide that sometimes you have to use finesse and charm to get things accomplished. sometimes you have to use a hammer. Today being a hammer kind of day I tapped the key a few (dozen) times, until it worked in the lock. About half an hour after the hammering (and the bulk of my day shot) I can finally drive the duck again.
So, in hindsight...
*Don't break your ignition switch.
*Don't expect a salvage yard ignition switch to work "out of the box".
*$30 for a key is bullshit.
*Seems to me I owe Kenny some beer.
*It would be really cool to be able to say I have Viper parts in my truck (and not in the bed).
Thursday, February 27, 2014
Preventitive maintenance part two-idler pulley replacement and overflow bottle cleaning.
So with the tune up all finished and driving the duck around for a bit I found the noise from the idler pulley to be still there, and an inspection of the pulley led to a failed bearing. After 226,000 miles it had definitely seen better days and was in need of replacement, before it locked up and spit the belt off the engine.
After again removing the serpentine belt, a 13 millimeter socket and ratchet remove the old idler pulley. This being the original pulley, there was a large washer that was used as a dust cover, to keep dirt away from the bearing and therefore keeping the pulley in service longer. On the replacement, the bearing is sealed, and the dust cover is not necessary, especially considering that the cover did not fit the pulley very well. The replacement pulley came with an insert to keep the pulley at the proper distance from the mounting point on the engine block, and some Loctite blue keeps the factory bolt in place when reinstalling once cured, usually 24 hours for a complete curing.
A pointer on using Loctite: Loctite comes in three versions, which are color coded according to their use. Loctite green is the lightest duty, and generally has no use that I am aware of in an automotive setting. Loctite red is the strongest duty, and is meant for use on something that you never want to come apart. Heat is required to break loose anything you decide to use the red strength for, and the red version is very unforgiving, so whatever you use this strength thread locker on plan to have it stay together forever.
Loctite blue is a good, all around keep it in place thread locker. You will need to use a proper wrench or other tool to break loose any bolts you apply this to, but it is forgiving in that you can actually take something apart without having to heat the bolt up to do so. I use this on anything I really don't want to come apart at an inopportune moment, like the aforementioned idler pulley, the A/C compressor I removed during the tune up, and in the future, the differential cover bolts.
I have not repaired the thermostat/upper radiator hose issue yet, but I did take notice that the coolant overflow tank has a lot of what looks like lime in it. It's actually cooling system sludge, along with rust and other junk that almost proved impossible to remove. Why clean the overflow bottle? Because you don't want that stuff to somehow make its way back into the rest of the cooling system, where it can clog up the radiator or whatever small passages exist.
I ended up using a combination of salt, water and ice cubes to clean the sludge off. What you need to do is remove the overflow tank (engine must be cold) and empty anything that might be in said tank in a responsible manner. You then add salt (about three tablespoons), some cold water (your goal is to make a slurry) and ice cubes. Shake this mixture in the tank until you have removed as much of the crud as you can, then rinse well with hot water and reinstall. The salt is abrasive enough to remove the deposits and the ice helps it move around in the tank, keeping your salty slurry on the target area.
Not sure at this moment what project I am going to tackle next, but I am thinking it will be the parking brake cable.
After again removing the serpentine belt, a 13 millimeter socket and ratchet remove the old idler pulley. This being the original pulley, there was a large washer that was used as a dust cover, to keep dirt away from the bearing and therefore keeping the pulley in service longer. On the replacement, the bearing is sealed, and the dust cover is not necessary, especially considering that the cover did not fit the pulley very well. The replacement pulley came with an insert to keep the pulley at the proper distance from the mounting point on the engine block, and some Loctite blue keeps the factory bolt in place when reinstalling once cured, usually 24 hours for a complete curing.
A pointer on using Loctite: Loctite comes in three versions, which are color coded according to their use. Loctite green is the lightest duty, and generally has no use that I am aware of in an automotive setting. Loctite red is the strongest duty, and is meant for use on something that you never want to come apart. Heat is required to break loose anything you decide to use the red strength for, and the red version is very unforgiving, so whatever you use this strength thread locker on plan to have it stay together forever.
Loctite blue is a good, all around keep it in place thread locker. You will need to use a proper wrench or other tool to break loose any bolts you apply this to, but it is forgiving in that you can actually take something apart without having to heat the bolt up to do so. I use this on anything I really don't want to come apart at an inopportune moment, like the aforementioned idler pulley, the A/C compressor I removed during the tune up, and in the future, the differential cover bolts.
I have not repaired the thermostat/upper radiator hose issue yet, but I did take notice that the coolant overflow tank has a lot of what looks like lime in it. It's actually cooling system sludge, along with rust and other junk that almost proved impossible to remove. Why clean the overflow bottle? Because you don't want that stuff to somehow make its way back into the rest of the cooling system, where it can clog up the radiator or whatever small passages exist.
I ended up using a combination of salt, water and ice cubes to clean the sludge off. What you need to do is remove the overflow tank (engine must be cold) and empty anything that might be in said tank in a responsible manner. You then add salt (about three tablespoons), some cold water (your goal is to make a slurry) and ice cubes. Shake this mixture in the tank until you have removed as much of the crud as you can, then rinse well with hot water and reinstall. The salt is abrasive enough to remove the deposits and the ice helps it move around in the tank, keeping your salty slurry on the target area.
Not sure at this moment what project I am going to tackle next, but I am thinking it will be the parking brake cable.
Saturday, February 22, 2014
Preventive Maintenance part one...underhood.
So today I decided to take advantage of the unusually warm weather and complete the tune up I have wanted to do for awhile. For this service, I gathered four Autolite spark plugs, BWD distributor cap and rotor, a spark plug wire kit, a Purolator air filter (just a paper one because oiled filters won't help this engine enough to justify the expense), and a serpentine belt. I also used disposable gloves, dielectric grease, anti-seize compound, masking tape, a sharpie, and a can of throttle body cleaner.
 |
| Gee Mr. Dale, what are these parts for? |
 |
| Ok so above you can see I am starting out with the engine all buttoned up...not bad for 226,000 plus miles. All that air box and tubing that sits over the engine needs to come out of the engine bay. |
 |
| With the air box out of the way I can start checking things...first is the throttle body, which is to the right... |
 |
| Holy crap did a troll take a dump in here? I tried soaking the butterfly but that alone did not work, so I decided to tackle the rest of the tune up first. |
 |
| Part of the tune up today was changing the serpentine belt. On my truck, this bolt that I am pointing at is what you loosen to move the tensioner and thereby loosen the belt. |
 |
| To get to the number one spark plug I have found it easier to unbolt and set the air conditioner compressor to the side, gently, leaving the lines attached. Note the line separator, loosen but do not remove the nut in the center because you have to move the metal line out of the way, slightly and gently, to get the bolt out of the a/c compressor mount. |
 |
| Here's a tip. Use masking tape and a sharpie to label the plug wires. Use masking tape to hold the plug onto the socket if needed. |
Before I installed the new plugs, I checked the gap and then adjusted it to 0.040 inches. Dodge states that the gap should be 0.035 inches, but I have run a 0.040 inch gap previously on my 1986 Chrysler Laser with the same engine setup with no issues, except for better fuel economy. In the middle of this part of the project I checked the accessory pulleys for noise and wear. The idler pictured below is making noise when you spin it by hand so it will need to be replaced. Then I noticed the coolant leaking around the thermostat housing. Looks like the upper radiator hose clamp might be loose, so I tightened it a little.
 |
| A little while back I was losing coolant. Looks like this is the culprit area, which narrows it down to hose, thermostat gasket or thermostat housing. I tightened the hose clamp but in the future I will pressure test the cooling system to be certain. |
 |
| Its hard to see in this photo but the center of the rotor and the contact are worn. The distributor cap was also worn down |
Before reinstalling the serpentine belt I started the engine and let it run for a few minutes to check to see if the noise I was hearing was valve train or accessory related. I did hear some minor noise which I attribute to either injector noise or rocker arm adjustment needing to be done. The belt also needs to "set" into the pulleys before driving it. Additionally, you would rather the belt go flying off the engine at your home rather than out driving your vehicle around.
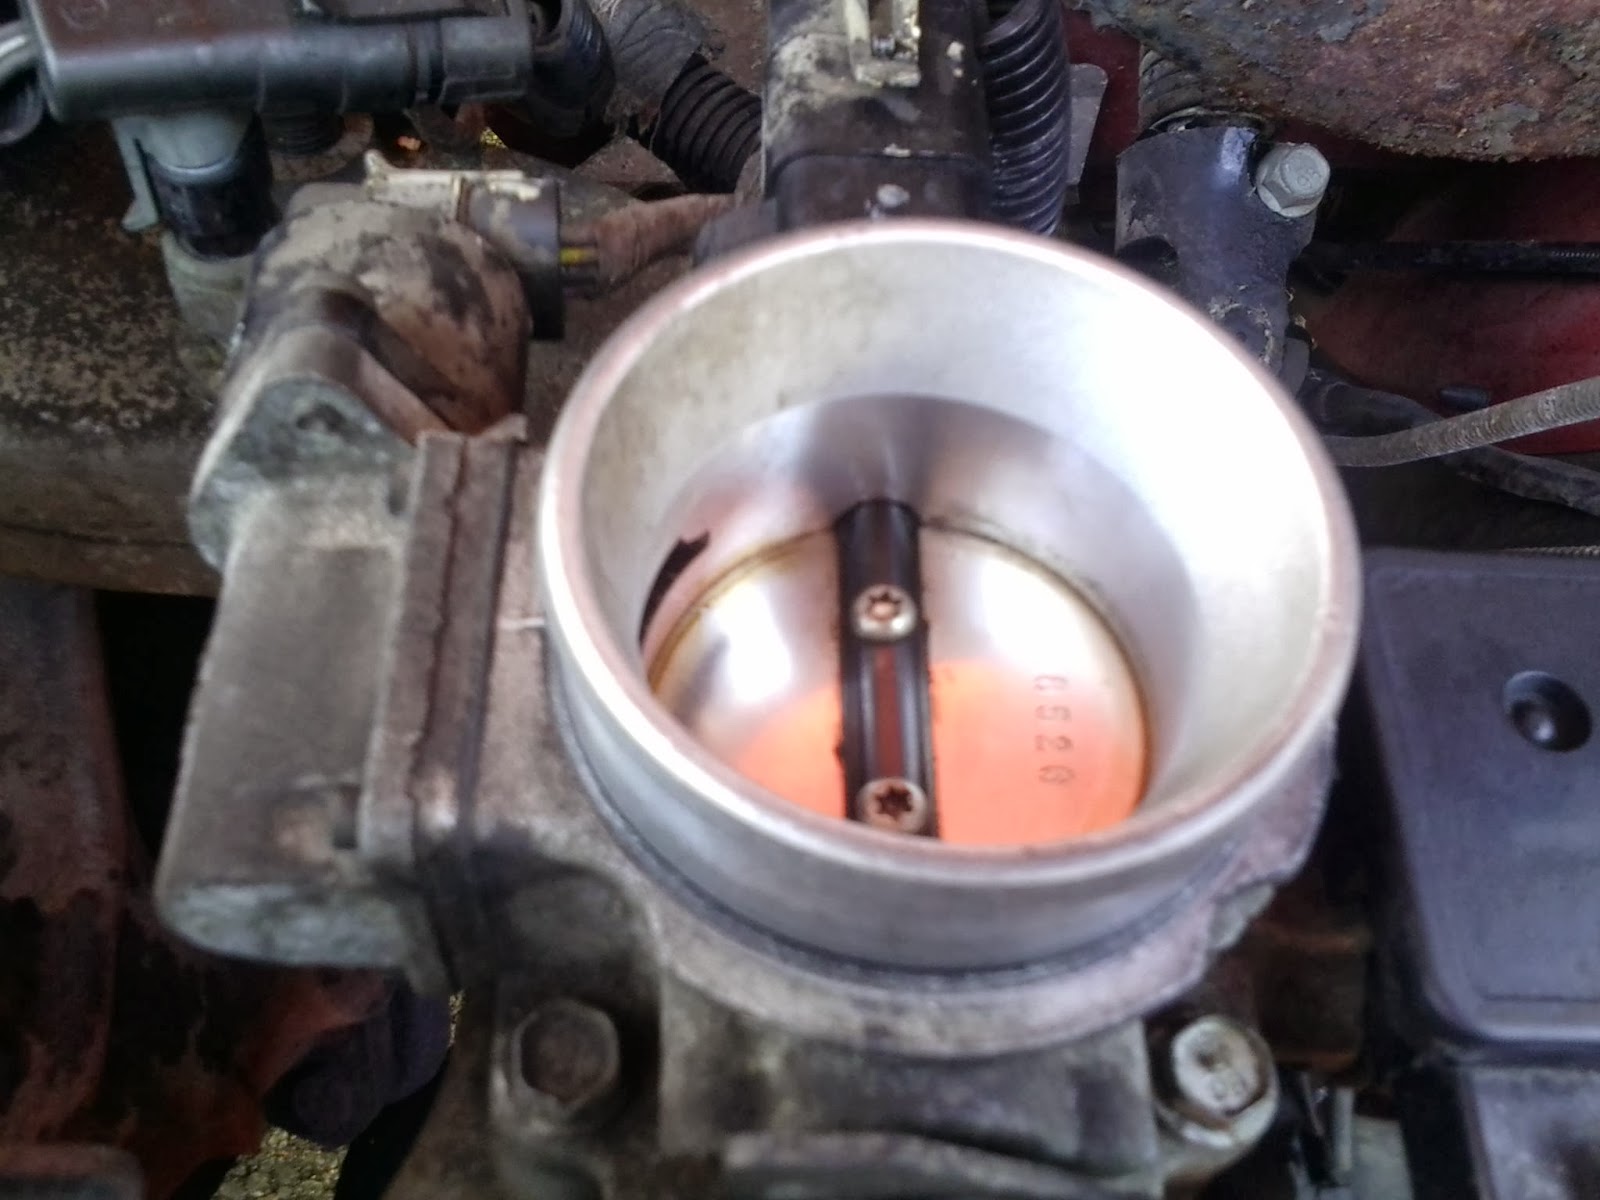 |
| This is way better... |
The reason for cleaning your throttle body, mass air flow sensor, intake tube and anything else having to do with the intake and fuel systems is there is dirt and other junk flying around in the air most of the time. This dirt can get into the engine without a good air filter and cause problems, like making the throttle body butterfly stick closed, hard throttle movement, bad fuel economy, and in general lackluster performance.

So, after doing all this work (took about two hours) the truck is definitely running better. Before the tune up the truck would move but it seemed to be sluggish at times. Now, the throttle response is better, the acceleration is improved, and just overall it feels like there is more power available. I still have to tackle the coolant leak and I still have to see what, if anything, is going on under the valve cover.
Saturday, January 25, 2014
Toolboxes anew and the progress so far.
First off, the shopping list for the duck is about halfway done, with fluids and a couple more filters still needing to be purchased. Now I just need a warm day or a warm garage to get all this going. I still have time, I just want this done and out of the way.
Speaking of getting things out of the way, I have spent almost a year trying to get a new toolbox. The biggest problems with getting one have been about the time I have the money together, something else needs attention or the one I ultimately purchased was not in stock.
If you have ever seriously looked for a decent box, you will find that many of the higher end boxes have higher end prices. Snap on boxes, for example, run into the thousands of dollars. Mac is kind of expensive as well, and while Kobalt is nice, stainless steel is just not something I want to mess with trying to keep it bright and shiny.
I had specific things I was looking for, such as 100 pound drawer capacity, 41 inches wide, not some god awful color (like hot neon pink) and not so expensive as to rival the combined national debt of the European Union. I ultimately decided on a Kodiak Pro Elite 41 inch tool chest which I bought through Home Depot.
First, their website says it will take up to two weeks plus processing time to get it shipped to my local Home Depot. So, you can imagine my surprise when it was at the store in under a week. The box was well packaged, wrapped in plastic over cardboard and had a pallet thing under it for ease of loading with a forklift. The friendly folks at home depot were kind enough to send a couple of guys to help me get it into the duck. I strapped it down and was on my way.
In between excitement of finally getting the box I have wanted for awhile, parking my truck on a public street, worrying about the local riff raff trying to steal it and it being about zero degrees with snow on the way, not much sleep was to be had for me. I think I must have checked on the box a couple dozen times before I went to sleep.
Morning comes and the box is still there, so off to work I go. After working my shift I unloaded the new toolbox, with the help of my boss (something that would NEVER happen at my last job) and got to work setting it up. There was a hole in the cardboard, and I thought for a moment that it would totally suck if I had to take this heavy thing back, but after unbolting the pallet and removing the coverings, no damage was found.
I am not going to bore you with the details of loading the box with my tools, but I will say the smart individual reads the instructions for assembly, is grateful the casters are preinstalled, and loads the box from the bottom drawers up, with the heaviest items in the bottom so the box is not likely to tip over.
I also learned that when you place items in a box that is the same size as the old one, and you go to place the tools in the new box in a neat manner, you find that the top box is looking like a good option, one I will be taking in the near future.
Speaking of getting things out of the way, I have spent almost a year trying to get a new toolbox. The biggest problems with getting one have been about the time I have the money together, something else needs attention or the one I ultimately purchased was not in stock.
If you have ever seriously looked for a decent box, you will find that many of the higher end boxes have higher end prices. Snap on boxes, for example, run into the thousands of dollars. Mac is kind of expensive as well, and while Kobalt is nice, stainless steel is just not something I want to mess with trying to keep it bright and shiny.
I had specific things I was looking for, such as 100 pound drawer capacity, 41 inches wide, not some god awful color (like hot neon pink) and not so expensive as to rival the combined national debt of the European Union. I ultimately decided on a Kodiak Pro Elite 41 inch tool chest which I bought through Home Depot.
First, their website says it will take up to two weeks plus processing time to get it shipped to my local Home Depot. So, you can imagine my surprise when it was at the store in under a week. The box was well packaged, wrapped in plastic over cardboard and had a pallet thing under it for ease of loading with a forklift. The friendly folks at home depot were kind enough to send a couple of guys to help me get it into the duck. I strapped it down and was on my way.
In between excitement of finally getting the box I have wanted for awhile, parking my truck on a public street, worrying about the local riff raff trying to steal it and it being about zero degrees with snow on the way, not much sleep was to be had for me. I think I must have checked on the box a couple dozen times before I went to sleep.
Morning comes and the box is still there, so off to work I go. After working my shift I unloaded the new toolbox, with the help of my boss (something that would NEVER happen at my last job) and got to work setting it up. There was a hole in the cardboard, and I thought for a moment that it would totally suck if I had to take this heavy thing back, but after unbolting the pallet and removing the coverings, no damage was found.
I am not going to bore you with the details of loading the box with my tools, but I will say the smart individual reads the instructions for assembly, is grateful the casters are preinstalled, and loads the box from the bottom drawers up, with the heaviest items in the bottom so the box is not likely to tip over.
I also learned that when you place items in a box that is the same size as the old one, and you go to place the tools in the new box in a neat manner, you find that the top box is looking like a good option, one I will be taking in the near future.
Thursday, January 16, 2014
Some customization ideas...since I have to do some repairs as it is...
So I was thinking that after I get the maintenance all squared away that I could start making some changes to the duck, and one of them is going to be replacing a slightly dented fender, which got dented when someone in the employ of the previous owner hit something and caved in the front bumper a little bit. The other is replacing the front bumper, but I was thinking about doing something a little different that you don't see a whole lot these days, a shaved bumper.
So, what is a shaved bumper?
Shaving a bumper is the process of making it look like it is one solid piece of steel. There are bumper covers that are made out of fiberglass that frankly try to make this happen, but as it is they are plastic, and plastic does not look right on a truck. What you would do is weld the mounting bolts to the bumper from the backside, then grind the heads off of the bolts from the face of the bumper, fill in the holes for the license plate (not a big deal since we are not required to run a front plate here), prime paint install enjoy.
I have also been toying with the idea of installing a set of actual driving lights in the truck. Not those cheap LED lights found at walmart, but actual white light, driving light, lights as they are supposed to be.
Pictures will be found here when this is done.
So, what is a shaved bumper?
Shaving a bumper is the process of making it look like it is one solid piece of steel. There are bumper covers that are made out of fiberglass that frankly try to make this happen, but as it is they are plastic, and plastic does not look right on a truck. What you would do is weld the mounting bolts to the bumper from the backside, then grind the heads off of the bolts from the face of the bumper, fill in the holes for the license plate (not a big deal since we are not required to run a front plate here), prime paint install enjoy.
I have also been toying with the idea of installing a set of actual driving lights in the truck. Not those cheap LED lights found at walmart, but actual white light, driving light, lights as they are supposed to be.
Pictures will be found here when this is done.
Sunday, January 12, 2014
The introductions...
Hello reader! My name is Dale (but not Dale D. Mechanic) and I live with my girlfriend in a nice little house in an ok (usually) borough in Southeast Pennsylvania. Please forgive my non-specifics on these matters, I do this out of habit. I'm in my early 40s, am trying to quit smoking, lead a somewhat normal life...
I am a mechanic by trade, something that it could be said I entered later in life. After working in the green industry for almost 15 years, I realized that there was nothing new under the sun, or whatever weather I was stuck working in, usually for 12 hours a day, ten months or better out of the year. I suppose I would still be working in that green industry if the company I had given ten years of my life to had not decided to outsource my position. Such is life.
After a short time working for the company my position was outsourced to, I found myself working as a fleet mechanic again in the green industry, mostly tree care, then taking a job with a fleet in Philadelphia, then getting sacked so that they could hire a drug dependent loser that thought he could do the job for half the pay, and who incidentially no longer works there either.
So these days I work for a small equipment repair shop. Honestly, it took me some time to shed the fleet maintenance mentality of "just make it work" and adopt the "fix it proper and ship it out" code of ethics.
You probably noticed that the name of the blog is "The Dakota Files". So I would like to introduce the "angry duck."
The "duck" is a 1996 Dodge Dakota Sport. It sports a 2.5 liter inline four cylinder engine, five speed manual transmission, standard cab, short bed, Chrysler corporate 8.25 rear end with a 3.55 gear ratio. It started life as a red truck but since it was part of a fleet they decided to paint it yellow. It currently has 225,000 miles on it, but runs reliably.
Besides the non factory paint, about the only enhancements that have been done are an aftermarket cd player (that refuses to play cds) and a hurst "T" handle shift lever. I have also painted the wheels a graphite color and clear coated them, had a set of new tires installed (pro tip: paint wheels AFTER tire installation). Maintenance items that have been done are oil changes, repairing a burnt wire that while in two pieces refused to let the truck start, installing a new starter and replacing the battery terminals because the old ones were crap. I also have replaced the battery.
This brings us to the list of maintenance items that I need to do, preferably before the inspection runs out. (Yes, we have yearly vehicle inspections, safety and emissions, that pack a hefty fine if you are caught driving without a valid one.) They are:
1.) Full tune up (cap, rotor, wires, plugs)
2.) Find and fix reason the check engine light comes on intermittently.
3.) Repair the parking brake cable and anchor/pivot point.
4.) Replace the serpentine belt.
5.) Change transmission fluid. (probably has never been done)
6.) Change differential fluid (also has probably never been done)
And some modifications, which are:
1.) Replace right inner door panel to match left inner door panel.
2.) Replace right mirror.
3.) Repaint rear bumper (and maybe get rid of plastic step cover?)
4.) Repair rust on rocker panels under door.
5.) Install bucket seats.
6.) Install radio that plays Cds.
7.) Clean up interior, especially the carpet.
8.) Find where the water leak is coming into the cabin.
I am a mechanic by trade, something that it could be said I entered later in life. After working in the green industry for almost 15 years, I realized that there was nothing new under the sun, or whatever weather I was stuck working in, usually for 12 hours a day, ten months or better out of the year. I suppose I would still be working in that green industry if the company I had given ten years of my life to had not decided to outsource my position. Such is life.
After a short time working for the company my position was outsourced to, I found myself working as a fleet mechanic again in the green industry, mostly tree care, then taking a job with a fleet in Philadelphia, then getting sacked so that they could hire a drug dependent loser that thought he could do the job for half the pay, and who incidentially no longer works there either.
So these days I work for a small equipment repair shop. Honestly, it took me some time to shed the fleet maintenance mentality of "just make it work" and adopt the "fix it proper and ship it out" code of ethics.
You probably noticed that the name of the blog is "The Dakota Files". So I would like to introduce the "angry duck."
The "duck" is a 1996 Dodge Dakota Sport. It sports a 2.5 liter inline four cylinder engine, five speed manual transmission, standard cab, short bed, Chrysler corporate 8.25 rear end with a 3.55 gear ratio. It started life as a red truck but since it was part of a fleet they decided to paint it yellow. It currently has 225,000 miles on it, but runs reliably.
Besides the non factory paint, about the only enhancements that have been done are an aftermarket cd player (that refuses to play cds) and a hurst "T" handle shift lever. I have also painted the wheels a graphite color and clear coated them, had a set of new tires installed (pro tip: paint wheels AFTER tire installation). Maintenance items that have been done are oil changes, repairing a burnt wire that while in two pieces refused to let the truck start, installing a new starter and replacing the battery terminals because the old ones were crap. I also have replaced the battery.
This brings us to the list of maintenance items that I need to do, preferably before the inspection runs out. (Yes, we have yearly vehicle inspections, safety and emissions, that pack a hefty fine if you are caught driving without a valid one.) They are:
1.) Full tune up (cap, rotor, wires, plugs)
2.) Find and fix reason the check engine light comes on intermittently.
3.) Repair the parking brake cable and anchor/pivot point.
4.) Replace the serpentine belt.
5.) Change transmission fluid. (probably has never been done)
6.) Change differential fluid (also has probably never been done)
And some modifications, which are:
1.) Replace right inner door panel to match left inner door panel.
2.) Replace right mirror.
3.) Repaint rear bumper (and maybe get rid of plastic step cover?)
4.) Repair rust on rocker panels under door.
5.) Install bucket seats.
6.) Install radio that plays Cds.
7.) Clean up interior, especially the carpet.
8.) Find where the water leak is coming into the cabin.
Subscribe to:
Posts (Atom)